Saturday, 31 October 2020

SharePoint 2013: Hide/Show Delete Icon In Ribbon On List Item Selection

 Introduction


In the previous article we explored  how to handle the delete icon on list item selection Enable/Disable.

In this article I will explore how to handle the delete icon in list item selection (hide/ show) based on the logged in user using CSOM/REST API and jQuery.

Scenario

The scenario is to disable the delete icon in the ribbon on the List item selection. But when any user logs into the SharePoint site the items created by him should have the delete option on them when only one selection is there. This can be performed using custom Permission Level with Delete permission removed and item-level or folder-level permissions, but this can cause you a lot of problems managing the broken inheritance of permissions. Or you could write an event handler to prevent deletion of that item but the best way to do it isby using jQuery/ CSOM/ REST.

I have offered a code demo about how to Hide delete icon in ribbon on List Item Selection.

Before

Hide delete icon

Solution

Here are the steps,

Step 1: Navigate to your SharePoint 2013 site.

Step 2: From this page select the Site Actions | Edit Page.

Edit the page, go to the "Insert" tab in the Ribbon and click the "Web Part" option. In the "Web Parts" picker area, go to the "Media and Content" category, select the "Script Editor" Web Part and press the "Add button".

Step 3: Once the Web Part is inserted into the page, you will see an "EDIT SNIPPET" link; click it. You can insert the HTML and/or JavaScript as in the following:

EDIT SNIPPET

  1. // JavaScript source code  
  2. < scripttype = "text/javascript"  
  3.     src = "http://ajax.aspnetcdn.com/ajax/jQuery/jquery-1.9.1.min.js" >   
  4. < /script>   
  5. < scripttype = "text/javascript" >   
  6.   
  7. $(document).ready(function()  
  8. {  
  9.     ExecuteOrDelayUntilScriptLoaded(init_HideButton, "sp.ribbon.js");  
  10. });  
  11.   
  12. function init_HideButton()  
  13. {  
  14.     setInterval(function()  
  15.     {  
  16.         HideDeleteIconRibbomButton();  
  17.     }, 1000);  
  18. }  
  19.   
  20. function HideDeleteIconRibbomButton()  
  21. {  
  22.     $('a[id*="Ribbon.ListItem.Manage.Delete-Medium"]').hide(); //Delete Icon Hyper link  
  23.     var cc = new SP.ClientContext.get_current();  
  24.     var web = cc.get_web();  
  25.     var listId = SP.ListOperation.Selection.getSelectedList();  
  26.     var selectedItems = SP.ListOperation.Selection.getSelectedItems();  
  27.     if (selectedItems.length == 1)  
  28.     {  
  29.         var flag = CheckCreatedAuthor(listId, selectedItems[0].id, _spPageContextInfo.userId);  
  30.         if (flag) $('a[id*="Ribbon.ListItem.Manage.Delete-Medium"]').show(); //Delete Icon Hyper link  
  31.     }  
  32.     else  
  33.     {  
  34.         $('a[id*="Ribbon.ListItem.Manage.Delete-Medium"]').hide();  
  35.     }  
  36. }  
  37. functionCheckCreatedAuthor(ListId, ItemID, AuthorID)  
  38. {  
  39.     var result = false;  
  40.     var url = _spPageContextInfo.webAbsoluteUrl + "/_api/web/lists/getbyid('" + ListId + "')/items?$filter=((ID eq '" + ItemID + "') and (ApprovalStatus eq 'Draft') and (Author/ID eq '" + AuthorID + "'))";  
  41.     getListItems(url, function(data)  
  42.     {  
  43.         var items = data.d.results;  
  44.         if (items.length > 0)  
  45.         {  
  46.             result = true  
  47.         }  
  48.         else  
  49.         {  
  50.             result = false;  
  51.         }  
  52.     }, function(data)  
  53.     {  
  54.         result = false;  
  55.     });  
  56.     return result;  
  57. }  
  58.   
  59. function getListItems(siteurl, success, failure)  
  60. {  
  61.     $.ajax(  
  62.     {  
  63.         async: false,  
  64.         url: siteurl,  
  65.         method: "GET",  
  66.         headers:  
  67.         {  
  68.             "Accept""application/json; odata=verbose"  
  69.         },  
  70.         success: function(data)  
  71.         {  
  72.             success(data);  
  73.         },  
  74.         error: function(data)  
  75.         {  
  76.             failure(data);  
  77.         }  
  78.     });  
  79. } < /script>  
  • Without any list item selection to hide delete icon in ribbon on List:
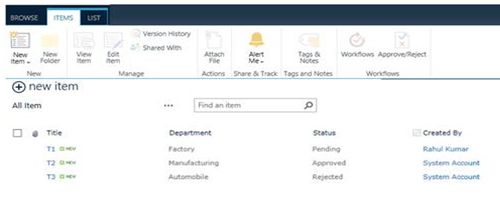
    list item

  • With Multi list item selection to hide delete icon in ribbon on List:
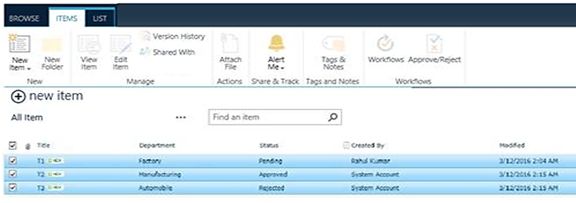
    New item

  • With Single list item Selection (Logged in) to show delete icon in ribbon on List.
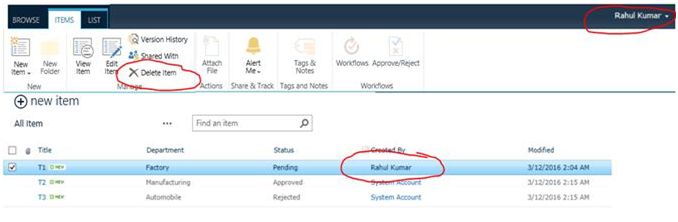
    delete item

Summary

I have tried to Hide/Show delete icon in ribbon on List Item Selection, which will provide you a greater flexibility in user interaction on the application. I have achieved this using CSOM/REST API and jQuery in SharePoint 2013. I hope this article is helpful to you and I expect you to revert back to it in case of any queries.

Wednesday, 28 October 2020

SharePoint 2013: Using REST API For Selecting, Filtering, Sorting And Pagination in SharePoint List

 Introduction


I have explained in the previous article how to work with SharePoint list items, basically performing CRUD operations, using the combination of REST API and jQuery Ajax. The REST URI ends with any OData query operators to specify selecting, sorting, or filtering.Let’s see other parameters and options which can be used with REST services. We will start from basic REST url and will take Selecting, filtering, sorting and pagination options one by one.

The main agenda of this Article is to understand how you can take selecting, filtering, sorting and pagination options one by one.

infolist

Scenarios

There can be scenarios where you want to perform additional operations on data returned by REST API like selecting, filtering, sorting and paginationfields only etc. For such operations while forming Url to Get data, we have to add some parameters as described below:

  • Selecting and sorting items

    $select

    This ‘’ /administration/_api/web/lists/getbytitle('infolist')/items’url returns all items with all possible fields or list columns. But what if list has more than 20-30 columns? It’s not good practice to get all fields. Get only specific fields which are required. You can select the specific attributes to return for your items using the $select parameter. Below example show how to use it.

    Syntax for this is $select=Field1, Field2, Field3
    /_api/web/lists/getbytitle('infolist')/items?$select=ID,Title,Employee,company

    xml

    '$orderby'

    If your response is a list of items, each with a number of field names, you can sort the list on a given field name using the $orderby, $orderby.asc or $orderby.desc system filter parameter.

    The first two specify sorting in ascending order and the third one descending order. It's simple, you can use '$orderby' parameter and provide the field name. REST service will return sorted list items in response.

    Syntax for this is $orderby=(Column Internal Name order)

    See below examples

    xml

Ascending Order

  1. /_api/web/lists/getbytitle('infolist')/items?$select=ID,Title,Employee,company&$orderby= Employee asc 
Descending Order
  1. /_api/web/lists/getbytitle('infolist')/items?$select=ID,Title,Employee,company&$orderby= Employee desc  
  • Filtering items:

    You can filter your list to contain only items which match a simple logical expression using the $filterparameter.

    Syntax: for this is $filter=(Column Internal Name operator value).
    See below examples,

    Filter by Title

    /_api/web/lists/getbytitle('infolist')/items?$filter=Employee eq ‘parth'

    Filter by ID:

    /_api/web/lists/getbytitle('infolist')/items?$filter=ID eq 2

    Filter by Date

    /_api/web/lists/getbytitle('infolist')/items?$filter=Start_x0020_Date le datetime'2016-03-26T09:59:32Z'

    Multiple Filters

    /_api/web/lists/getbytitle('infolist')/items?$filter=( Modified le datetime'2016-03-26T09:59:32Z') and (ID eq 2)

    Title name starts with the letter P

    /_api/web/lists/getbytitle(‘'infolist')/items?$filter=startswith(Title,‘P’)

    Return all items from the 'infolist'list modified in May

    /_api/web/lists/getbytitle(‘'infolist')/items? $filter=month(Modified) eq 5


    code

    OData query operators supported in the SharePoint REST service,

    table

  • Paging items

    The $top operators are used to implement paging for results. The $top operator specifies how many results to return.

    Syntax for this is $top Count. This returns top and records.

    See below example
    1. /_api/web/lists/getbytitle('infolist')/items?$top 5  

Note

The $skipoperator does not work in SharePoint 2013 on list items.it works only on Lists.

See below example

/_api/web/lists? Orderby Title desc&$skip

$expand

This is very useful when dealing with person or lookup fields where only Id is returned. Using this we can get corresponding value based on Id.

See below example

Lookup Field:Say there is City column in County list which is a lookup to Title column in Info List.

  1. /_api/web/lists/getbytitle('infolist')/items?$select=ID,Title,Employee,company,city/Id&$expand=city/Id  
People Field

Let’s say a list has a custom field: Author, it will return ‘AuthorId’ in response. What is the proper way to deal with people's fields? You need to use ‘$expand’ parameter to expand the field.

Following REST URL gives your idea how to use $expand.
  1. /_api/web/lists/getbytitle('infolist')/items?$select=Author/Title&$expand=Author/Id  
Reference

Tuesday, 27 October 2020

SharePoint 2013: How To Enable/Disable Delete Icon In Ribbon On List Item Selection

 Introduction:


In this article, I will explore how to handle the delete icon on list item selection (enabling/ disabling) based on the logged-in user using CSOM/REST API services using jQuery

Scenario:

The scenario is to disable the delete icon in the ribbon on the List item selection. But when any user logs into the SharePoint site the items created by him should have the delete option on them when only one selection is there. This can be performed using custom Permission Level with Delete permission removed and item-level or folder-level permissions, but this can cause you a lot of problem managing the broken inheritance of permissions. Or you could write an event handler to prevent the deletion of that item but the best way to do is using jQuery/ CSOM/ REST.

I have offered a code demo about how to disable the delete icon in the ribbon on List Item Selection.

Before:

before

Solution:

Here are the steps:

Step 1: Navigate to your SharePoint 2013 site.

Step 2: From this page select the Site Actions | Edit Page.

Edit the page, go to the "Insert" tab in the Ribbon, and click the "Web Part" option. In the "Web Parts" picker area, go to the "Media and Content" category, select the "Script Editor" Web Part and press the "Add button".

Step 3:

Once the Web Part is inserted into the page, you will see an "EDIT SNIPPET" link; click it. You can insert the HTML and/or JavaScript as in the following:

embed

  1. // JavaScript source code   
  2. < script type = "text/javascript"  
  3. src = "http://ajax.aspnetcdn.com/ajax/jQuery/jquery-1.9.1.min.js" > < /script>  < script type = "text/javascript"  
  4. language = "javascript" >  
  5.   
  6.     $(document).ready(function()  
  7.     {  
  8.         $(document.getElementById('Ribbon.ListItem.Manage-LargeMedium-1-2')).addClass('ms-cui-row ms-cui-disabled');  
  9.         ExecuteOrDelayUntilScriptLoaded(init_disableRibbomButton, "sp.ribbon.js");  
  10.     });  
  11.   
  12. function init_disableRibbomButton()  
  13. {  
  14.     setInterval(function()  
  15.     {  
  16.         disableRibbomButton();  
  17.   
  18.     }, 10);  
  19. }  
  20. //Using CSOM GetSelectedItems  
  21. function disableRibbomButton()   
  22. {  
  23.     var cc = new SP.ClientContext.get_current();  
  24.     var web = cc.get_web();  
  25.     var listId = SP.ListOperation.Selection.getSelectedList();  
  26.     var selectedItems = SP.ListOperation.Selection.getSelectedItems();  
  27.     if (selectedItems.length == 1)  
  28.     {  
  29.         var flag = CheckCreatedBy(listId, selectedItems[0].id, _spPageContextInfo.userId);  
  30.         if (flag)  
  31.             $(document.getElementById('Ribbon.ListItem.Manage-LargeMedium-1-2')).removeClass('ms-cui-row ms-cui-disabled');  
  32.     } else  
  33.     {  
  34.         $(document.getElementById('Ribbon.ListItem.Manage-LargeMedium-1-2')).addClass('ms-cui-row ms-cui-disabled');  
  35.     }  
  36.   
  37. }  
  38. //Using REST API Apply Filter Created Item by logged in user  
  39. function CheckCreatedBy(ListId, ItemID, AuthorID)  
  40. {  
  41.     var result = false;  
  42.     var url = _spPageContextInfo.webAbsoluteUrl + "/_api/web/lists/getbyid('" + ListId + "')/items?$filter=((ID eq '" + ItemID + "') and (Author/ID eq '" + AuthorID + "'))";  
  43.   
  44.     getListItems(url, function(data)  
  45.     {  
  46.         var items = data.d.results;  
  47.         if (items.length > 0)  
  48.         {  
  49.             result = true  
  50.         } else   
  51.         {  
  52.             result = false;  
  53.         }  
  54.   
  55.     }, function(data)  
  56.     {  
  57.         result = false;  
  58.     });  
  59.     return result;  
  60. }  
  61.   
  62. function getListItems(siteurl, success, failure)   
  63. {  
  64.     $.ajax  
  65.     ({  
  66.         async: false,  
  67.         url: siteurl,  
  68.   
  69.         method: "GET",  
  70.   
  71.         headers:  
  72.       {  
  73.             "Accept""application/json; odata=verbose"  
  74.         },  
  75.         success: function(data)  
  76.         {  
  77.             success(data);  
  78.         },  
  79.         error: function(data)   
  80.         {  
  81.             failure(data);  
  82.         }  
  83.     });  
  84. } < /script>  
  • Without any list item Selection to disable delete icon in ribbon on List.

    new

  • With Multi list item Selection to disable delete icon in the ribbon on List:

    list

  • With Single list item Selection Selection (Logged in) to unable delete icon in ribbon on List.

    list

Summary:

I have tried to disable/enable the delete icon in the ribbon on List Item Selection, which would provide you greater flexibility in user interaction on the application. I have achieved this using CSOM/REST API and jQuery in SharePoint 2013. I hope this article is helpful to you and I expect you to revert back to it in case of any queries.

SharePoint 2013 - Uploading Multiple Attachments To The New Item On List Using JSOM And REST API

  Introduction In this article, we will explore how we can attach multiple attachments to the new item on list using JSOM and REST API. Ther...